Showing 51 items matching coloured clay
-
 Federation University Art Collection
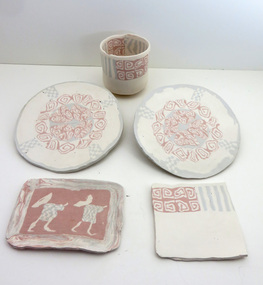
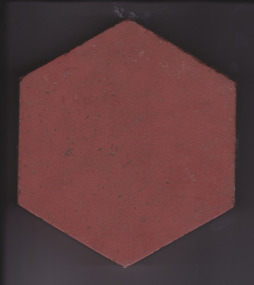
Ceramic - Artwork-Ceramics, [Test slabs]
... coloured clay... bisque fired. coloured clay test tile ceramics ...Five test slabs with colour inlays bisque fired. coloured clay, test tile, ceramics -
 Alfred Hospital Nurses League - Nursing Archive
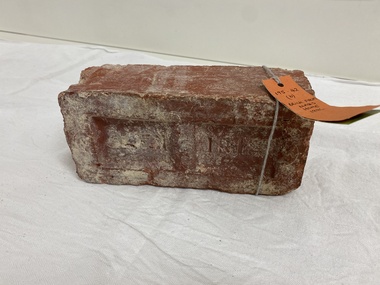
Functional object - Brick, Glen Iris Brick Company, (c. 1960)
... Dirty terracotta coloured rectangular clay brick, one side... [Maker's mark] Dirty terracotta coloured rectangular clay brick ...This brick was part of a group of brick that were salvaged during demolition of the main Alfred Hospital Nurses Home on 5 August, 1996.This brick and others from this group are significant to the Alfred Hospital Nurses League as many members lived there during their training and there was much controversy around the demolition of the building.Dirty terracotta coloured rectangular clay brick, one side has two rectangluar depressions, multiple chips off all sidesGLEN IRIS [Maker's mark]nurses home, brick, alfred hospital, alfred hospital nurses league, building, nurse accomodation -
 Whitehorse Historical Society Inc.
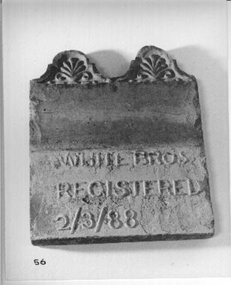
Decorative object - Garden Tile, c1888
... Sandy clay coloured garden edging tile, square base... Mitcham melbourne Garden Tile Decorative object Sandy clay ...Garden edging manufactured by White Bros which is now known as Vitclay.Sandy clay coloured garden edging tile, square base with decorative top.'White Bros/Registered/2/3/88/ pressed onto front of tile.ceramics, terracotta -
 Clunes Museum
Container - JUG, SHARPE BROS
... AT THE NECK OF THE JUG AND CLAY COLOURED GLAZE AROUND TO JUG BELOW... AT THE NECK OF THE JUG AND CLAY COLOURED GLAZE AROUND TO JUG BELOW ...JUG USED TO CONTAIN GINGER BEERSTONEWARE JUB WITH WIRE HANDLE, BROWN CERAMIC GLAZE AT THE NECK OF THE JUG AND CLAY COLOURED GLAZE AROUND TO JUG BELOW THE BROWN"HEALTH BEVERAGES - WHEN EMPTY RETURN TO SHARPE BROS AUSTRALIA AND NEW ZEALAND" IN BLACK LETTERING ON THE BODY OF THE JUGstoneware, jug, ginger beer -
 Nillumbik Shire Council
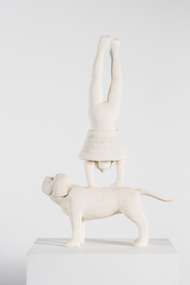
Sculpture: Liz Williams, Liz Williams, In Love, c.1996
... rather than colour / Sometimes she uses a coloured clay like... rather than colour / Sometimes she uses a coloured clay like ...Williams' use of the dog and poem was inspired by a print by the late Barbara Hanrahan (an artist friend) in which a women was holding a cat accompanied by a dog and in which words from a William Blake poem were included / After her mother died Williams made a work of her mother with the dog, holding the cat and using the same words in the Hanrahan print / The dog is a family pet; Dolcie, that Williams fell in love with / The dog as a symbol has been used in fifteenth and sixteenth century painting to represent fidelity in marriage / The use of the dog is also a contradiction to the themes in this work by Williams / Williams found that many of her women friends were having emotional and romantic difficulties, suffering from the same malady again and again, feeling rejected, destroyed and having unfulfilled desires / The female figure standing on her hands is not seeing things realistically / The figure is head over heels, vulnerable, with her skirt around her head revealing more than normal / The text enhances the meaning of the work and draws the viewer into experiencing the foolishness of love, demanding the viewer travel around and around to read it / Overall the dog provides structure to the work and a reliable object on which all else balances / Balance has been one of the recurring or repetitive themes within William's work / It references the physicality of clay, the difficulties in creating balance with the clay and balance in the work / Williams' work is about form rather than colour / Sometimes she uses a coloured clay like a pale terracotta / Williams likes the flatness of the surface in relationship to the marks of the text / She describes herself as a Minimalist, paring down the form to the bare essentials. 'In Love' was a finalist in the 1997 Nillumbik Art Award held at the Eltham Community and Reception Centre, Pitt Street, Eltham. A ceramic sculpture made of white stoneware clay (coated with a wash of gesso) of a girl doing a hand stand on the back of a dog (retriever?) / Her face/head is partially covered by her skirt which has come down / Her skirt is inscribed in the round with the poem "The Lady's First Song" (1938) by W.B. Yeats (see inscriptions and markings) / The dog is looking straight ahead and upwards towards the sky and his tail is pointing straight out. The dog is covered with cross-hatch incised lines to give the illusion of fur and texture / Hand written inscription of W.B. Yeats poem "The Lady's First Song" (1938) on girl's skirt / I turn round / Like a dumb beast in a show. / Neither know what I am / Nor where I go, / My language beaten / Into one name; / I am in love / And that is my shame. / What hurts the soul / My soul adores, / No better than a beast / Upon all fours.williams / yeats / love / ceramic / stoneware / dog -
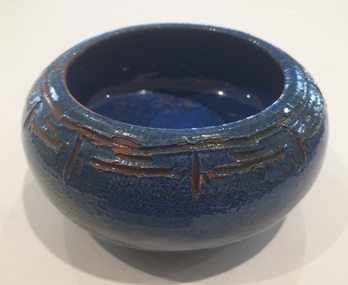 Federation University Art Collection
Ceramic, Gladys Reynell et al, Blue Bowl By Osrey, 1923
... dump of buff-coloured clay from a well at nearby McLaren Vale... dump of buff-coloured clay from a well at nearby McLaren Vale ...Gladys REYNELL (04/091881 - 16/11/1956) Born Glenelg, South Australia Gladys Reynell was South Australia's first studio potter and the first Australian artist to apply modernist principles to the crafts. For four years she worked from Ballarat. Osrey Pottery Ballarat operated between 1922 and 1926 by Gladys Reynell and George Osborne. The name of the pottery was an acronym formed from their surnames. Gladys Reynell, her sister Emily and brothers Rupert and Carew supported the war effort during World War One. Rupert Reynell was a neurologist who valued handicrafts in the rehabilitation of shell-shocked soldiers. He influenced Gladys and Margaret Rose (Rose) McPherson (later known as Margaret Preston) to learn pottery at the Camberwell School of Arts and Crafts, London, in 1916. Next year a friend sent Gladys some Kangaroo Island clay which excited her: 'I thought then that it could be the most delightful thing on earth to make pots in Australia from virgin clay'. In 1918 Gladys and Rose began teaching pottery to soldiers at Seale Hayne Neurological Hospital, Devon. In September 1919 Gladys Reynell came home in September due to her father's illness. She established the Reynella Pottery and became responsible for all stages of pottery production. Using a seasoned dump of buff-coloured clay from a well at nearby McLaren Vale Gladys Reynell built and fired her own kiln; threw simple, robust forms based on early European folk pottery; and decorated them with designs inspired by both Aboriginal art—one of the earliest to use this as a source. Gladys Reynell decorated her earthenware pottery with the characteristic rich 'Reynella blue' slip. On 14 August 1922 at St Mary's Church, Edwardstown, Gladys married George Samuel Osborne, an ex-serviceman and gardener at Reynella; they had no children. Between 1922 and 1926 they set up Osrey Pottery In Ballarat. Gladys produced pottery for sale at fairs with George as her assistant. She would throw her pots in the street, causing a sensation. In 1926 George contracted lead poisoning from lead in the glazes. They moved to rural Curdievale where Gladys resumed painting and making woodcuts. From 1939 Gladys and George lived in Melbourne. In World War II she worked in the army pay corps, in the Taxation Office, and as a translator of French. Gladys died of cancer on 16 November 1956; her husband scattered her ashes at Reynella. Her ceramics, the work of one of Australia's earliest studio potters, have been avidly collected since the late 1960s and are in most major art galleries. Small blue glazed ceramic bowl incised around the top with a decorative frieze. Incised on the base "(Dam Clay) Ballarat 1923, Osrey"gladys reynell, osrey pottery, blue bowl, incised bowl, australian studio pottery, ceramics, native clay -
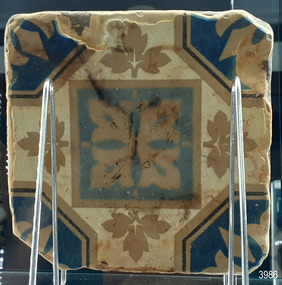
 Flagstaff Hill Maritime Museum and Village
Ceramic - Floor Tile, circa 1878
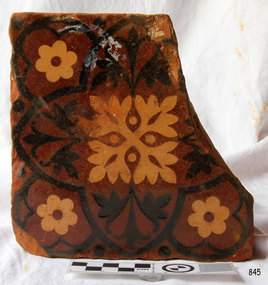
... , as “coloured slips” (or liquid clay) were poured into a deep pre-molded..., as “coloured slips” (or liquid clay) were poured into a deep pre-molded ...This Minton floor tile is from the wreck of the Loch Ard and is currently on display in the Great Circle Gallery at Flagstaff Hill. The iron hulled clipper ship from the Loch Line was heading for Port Phillip from London, when it ran into the cliffs of Mutton Bird Island near Port Campbell. The Loch Ard was laden with a high value cargo including luxury goods intended for display at the Melbourne International Exhibition in 1880. One notable survivor from the ship’s freight manifest was the well packed Minton porcelain peacock, a two meter high ceramic masterpiece of vivid glazed colours. (This is also on display in the Great Circle Gallery). The almost total loss of life and property from the Loch Ard registered as a shocking tragedy for the Colony of Victoria, at a time when social confidence and economic optimism were otherwise high. Wealth generated from Gold and Wool was increasingly being spent on grandiose private residences and imposing public buildings. The demand for quality furnishings and fittings was therefore strong. Among the products consigned to burgeoning colonial markets by the Milton pottery at Stoke upon Trent, were their new range of colourfully patterned but very durable floor tiles ideal for the high-traffic spaces in the large civic buildings then being constructed in Australia and America. These new floor tiles were “encaustic”, meaning that their designs and colours were encased “within” the depth of the tile. Rather than their decorative patterns being glazed onto the surface of the tile, their inlaid designs were created during the manufacturing process, as “coloured slips” (or liquid clay) were poured into a deep pre-molded casting. When fired, the resulting tile was colours-fast and design-fast. The Minton floor tile is significant for its hard-wearing yet attractive design. The shipwreck of the Loch Ard is of significance for Victoria and is registered on the Victorian Heritage Register ( S 417). Flagstaff Hill has a varied collection of artefacts from Loch Ard and its collection is significant for being one of the largest accumulations of artefacts from this notable Victorian shipwreck of which the subject items are a small part. The collections of objects give us a snapshot of how we can interpret the story of this tragic event. The collection is also archaeologically significant as it represents aspects of Victoria's shipping history that allows us to interpret Victoria's social and historical themes of the time. Through is associated with the worst and best-known shipwreck in Victoria's history. A square Minton floor tile with a dark brown, beige and white pattern. The tile has a piece broken off along one side and some chipping along the edges. This ‘encaustic’ floor tile was recovered from the shipwreck of the LOCH ARD. Branded "... MINTON&CO Patent ..."flagstaff hill, warrnambool, flagstaff hill maritime museum, shipwreck coast, flagstaff hill maritime village, great ocean road, loch line, loch ard, captain gibbs, eva carmichael, tom pearce, glenample station, mutton bird island, minton floor tile, encaustic tile, melbourne international exhibition, floor tile -
 Flagstaff Hill Maritime Museum and Village
Ceramic - Floor Tile, circa 1878
... , as “coloured slips” (or liquid clay) were poured into a deep pre..., as “coloured slips” (or liquid clay) were poured into a deep pre ...This Minton floor tile is from the wreck of the Loch Ard. The iron-hulled clipper ship from the Loch Line was heading for Port Phillip from London, when it ran into the cliffs of Mutton Bird Island near Port Campbell. The Loch Ard was laden with high-value cargo including luxury goods intended for display at the Melbourne International Exhibition in 1880. One notable survivor from the ship’s freight manifest was the well-packed Minton porcelain peacock, a two-meter high ceramic masterpiece of vivid glazed colours. (This is also on display in the Great Circle Gallery). The almost total loss of life and property from the Loch Ard registered as a shocking tragedy for the Colony of Victoria, at a time when social confidence and economic optimism were otherwise high. The wealth generated from Gold and Wool was increasingly being spent on grandiose private residences and imposing public buildings. The demand for quality furnishings and fittings was therefore strong. Among the products consigned to burgeoning colonial markets by the Milton Pottery at Stoke upon Trent, were their new range of colourfully patterned but very durable floor tiles ideal for the high-traffic spaces in the large civic buildings then being constructed in Australia and America. These floor tiles were “encaustic”, meaning that their designs and colours were encased “within” the depth of the tile. Rather than their decorative patterns being glazed onto the surface of the tile, their inlaid designs were created during the manufacturing process, as “coloured slips” (or liquid clay) were poured into a deep pre-moulded casting. When fired, the resulting tile was colour-fast and design-fast. The Minton floor tile is significant for its hard-wearing yet attractive design. The shipwreck of the Loch Ard is of significance for Victoria and is registered on the Victorian Heritage Register ( S 417). Flagstaff Hill has a varied collection of artefacts from Loch Ard and its collection is significant for being one of the largest accumulations of artefacts from this notable Victorian shipwreck of which the subject items are a small part. The collections of objects give us a snapshot of how we can interpret the story of this tragic event. The collection is also archaeologically significant as it represents aspects of Victoria's shipping history that allows us to interpret Victoria's social and historical themes of the time. Through is associated with the worst and best-known shipwreck in Victoria's history. A square Minton floor tile with a white background, and beige, dark blue, light blue and black geometric pattern as well as leaves in the design. The tile has corner broken off and some chipping along the edges. The reverse has five rows of five evenly spaced holes. The back of the tile has inscriptions. Made by Minton & Co. at Stoke upon Trent. This encaustic floor tile was recovered from the shipwreck of the LOCH ARD. Branded "... MINTON&CO / PATENT / STOKE UPON TRENT"flagstaff hill, warrnambool, flagstaff hill maritime museum, shipwreck coast, flagstaff hill maritime village, great ocean road, loch line, loch ard, captain gibbs, eva carmichael, tom pearce, glenample station, mutton bird island, minton floor tile, encaustic tile, melbourne international exhibition, floor tile, minton tile, minton & co., stoke upon trent -
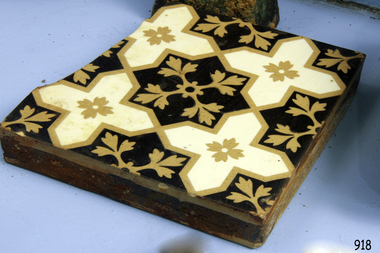
 Flagstaff Hill Maritime Museum and Village
Ceramic - Tile, circa 1878
... , as “coloured slips” (or liquid clay) that were poured into a deep pre..., as “coloured slips” (or liquid clay) that were poured into a deep pre ...This Minton floor tile is from the wreck of the LOCH ARD. Other examples of this manufacture have been recovered from the wreck site and form part of the collection at Flagstaff Hill. The iron-hulled clipper ship from the Loch Line was heading for Port Phillip from London when it ran into the cliffs of Mutton Bird Island near Port Campbell and was wrecked on the early morning of June 1, 1878. The LOCH ARD was laden with high-value cargo including luxury goods intended for display at the Melbourne International Exhibition in 1880. One notable survivor from the ship’s freight manifest was the well-packed Minton porcelain peacock, a two-metre-high ceramic masterpiece of vivid glazed colours. The almost total loss of life and property from the LOCH ARD registered as a shocking tragedy for the Colony of Victoria, at a time when social confidence and economic optimism were otherwise high. The wealth generated from gold and wool was increasingly being spent on magnificent private residences and imposing public buildings. The demand for quality furnishings and fittings was therefore strong. Among the products consigned to burgeoning colonial markets by the Milton Pottery at Stoke upon Trent were their new range of colourfully patterned but very durable floor tiles – ideal for the high-traffic spaces in the large civic buildings then being constructed in Australia and America. These new floor tiles were “encaustic”, meaning that their designs and colours were encased within the depth of the tile. Rather than their decorative patterns being glazed onto the surface of the tile, their inlaid designs were created during the manufacturing process, as “coloured slips” (or liquid clay) that were poured into a deep pre-moulded casting. When fired, the resulting tile was colour-fast and design-fast.The Minton encaustic floor tile is significant for its method of manufacture which makes it durable as well as decorative. The shipwreck of the LOCH ARD is of State significance. Victorian Heritage Register S417. Flagstaff Hill’s collection of artefacts from LOCH ARD is significant for being one of the largest collections of artefacts from this shipwreck in Victoria. It is significant for its association with the shipwreck, which is on the Victorian Heritage Register (VHR S417). The collection is significant because of the relationship between the objects, as together they have a high potential to interpret the story of the LOCH ARD. The LOCH ARD collection is archaeologically significant as the remains of a large international passenger and cargo ship. The LOCH ARD collection is historically significant for representing aspects of Victoria’s shipping history and its potential to interpret sub-theme 1.5 of Victoria’s Framework of Historical Themes (living with natural processes). The collection is also historically significant for its association with the LOCH ARD, which was one of the worst and best-known shipwrecks in Victoria’s history.A square Minton floor tile with a black and beige pattern against a white base. This encaustic floor tile was recovered from the shipwreck of the LOCH ARD. On the back, or base, of the tile is inscribed the number “46” and the letters “Minton & Co Patent Stoke upon Trent”.flagstaff hill, warrnambool, shipwrecked coast, flagstaff hill maritime museum, maritime museum, shipwreck coast, flagstaff hill maritime village, great ocean road, loch line, loch ard, mutton bird island, loch ard gorge, minton floor tile, encaustic tile, melbourne international exhibition, floor tile -
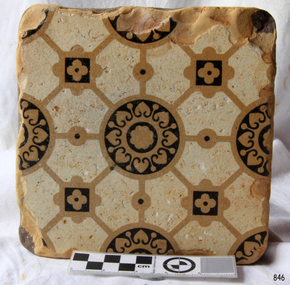
 Flagstaff Hill Maritime Museum and Village
Ceramic - Tile, circa 1878
... , as “coloured slips” (or liquid clay) were poured into a deep pre..., as “coloured slips” (or liquid clay) were poured into a deep pre ...This Minton floor tile is from the wreck of the LOCH ARD along with other examples of this manufacture recovered from the wreck site and form part of the collection at Flagstaff Hill. The iron-hulled clipper ship from the Loch Line was heading for Port Phillip from London when it ran into the cliffs of Mutton Bird Island near Port Campbell and was wrecked on June 1st, 1878. The LOCH ARD was laden with high-value cargo including luxury goods intended for display at the Melbourne International Exhibition in 1880. One notable survivor from the ship’s freight manifest was the well-packed Minton porcelain peacock, a two-metre-high ceramic masterpiece of vivid glazed colours. The almost total loss of life and property from the LOCH ARD registered as a shocking tragedy for the Colony of Victoria, at a time when social confidence and economic optimism were otherwise high. The wealth generated from Gold and Wool was increasingly being spent on grandiose private residences and imposing public buildings. The demand for quality furnishings and fittings was therefore strong. Among the products consigned to burgeoning colonial markets by the Milton Pottery at Stoke upon Trent, were their new range of colourfully patterned but very durable floor tiles – ideal for the high-traffic spaces in the large civic buildings then being constructed in Australia and America. These new floor tiles were “encaustic”, meaning that their designs and colours were encased “within” the depth of the tile. Rather than their decorative patterns being glazed onto the surface of the tile, their inlaid designs were created during the manufacturing process, as “coloured slips” (or liquid clay) were poured into a deep pre-moulded casting. When fired, the resulting tile was colour-fast and design-fast. A brief history of the Loch Ard (1873-1878): - The sailing ship Loch Ard was one of the famous Loch Line ships that sailed from England to Australia. Barclay, Curdle and Co. built the three-masted iron vessel in Glasgow in 1873. It had sailed three trips to Australia and one trip to Calcutta before its fateful voyage. Loch Ard left England on March 2, 1878, under the command of recently married, 29-year-old Captain Gibbs. It was bound for Melbourne with a crew of 37, plus 17 passengers. The general cargo reflected the affluence of Melbourne at the time. Onboard were straw hats, umbrellas, perfumes, clay pipes, pianos, clocks, confectionery, linen and candles, and a heavier load of railway irons, cement, lead and copper. Other cargo included items intended for display in the Melbourne International Exhibition of 1880. The Loch Ard had been sailing for three months and was close to its destination on June 1, 1878. Captain Gibbs had expected to see land at about 3 am but the Loch Ard ran into a fog that greatly reduced visibility and there was no sign of land or the Cape Otway lighthouse. The fog lifted at 4 am and the sheer cliffs of Victoria's west coast were much closer to them than Captain Gibbs expected. He tried to manage the vessel but failed and the ship struck a reef at the base of Mutton Bird Island, near Port Campbell. The top deck loosened from the hull, and the masts and rigging crashed down, knocking passengers and crew overboard. The lifeboat was launched by Tom Pearce but crashed into the side of Loch Ard and capsized. He clung onto its overturned hull and sheltered under it. He drifted out to sea and the tide brought him back to what is now called Loch Ard Gorge. He swam to shore and found a cave for shelter. A passenger, Eva Carmichael, had raced onto the deck to find out what was happening and was confronted by towering cliffs above the ship. She was soon swept off the ship by a huge wave. Eva saw Tom Pearce on a small rocky beach and yelled to attract his attention. He swam out and dragged her to the shelter of the cave. He revived her with a bottle of brandy from a case that had washed up on the beach. Tom scaled a cliff in search of help and followed some horse hoof prints. He came from two men from Glenample Station, three and a half miles away. He told the men of the tragedy and then returned to the gorge while the two men rode back to the station to get help. They reached Loch Ard Gorge and took the two shipwreck survivors to Glenample Station to recover. Eva stayed at the station for six weeks before returning to Ireland by steamship. In Melbourne, Tom Pearce received a hero's welcome and was presented with a medal and some money. Of the 54 crew members and passengers on board, only two survived: the apprentice, Tom Pearce and the young woman passenger, Eva Carmichael, who lost her family in the tragedy. One of the most unlikely pieces of cargo to have survived the shipwreck was a Minton porcelain peacock - one of only nine in the world. The peacock was destined for the Melbourne International Exhibition in 1880. It had been well packed, which gave it adequate protection during the violent storm. Today, the Minton peacock can be seen at the Flagstaff Hill Maritime Museum in Warrnambool. From Australia's most dramatic shipwreck, it has now become Australia's most valuable shipwreck artefact and is one of very few 'objects' on the Victorian State Heritage Register. The Minton floor tile is significant for its hard-wearing yet attractive design. The shipwreck of the LOCH ARD is of State significance. Victorian Heritage Register S417. Flagstaff Hill’s collection of artefacts from LOCH ARD is significant for being one of the largest collections of artefacts from this shipwreck in Victoria. It is significant for its association with the shipwreck, which is on the Victorian Heritage Register (VHR S417). The collection is significant because of the relationship between the objects, as together they have a high potential to interpret the story of the LOCH ARD. The LOCH ARD collection is archaeologically significant as the remains of a large international passenger and cargo ship. The LOCH ARD collection is historically significant for representing aspects of Victoria’s shipping history and its potential to interpret sub-theme 1.5 of Victoria’s Framework of Historical Themes (living with natural processes). The collection is also historically significant for its association with the LOCH ARD, which was one of the worst and best-known shipwrecks in Victoria’s history. A square Minton floor tile with a black and apricot pattern against a chocolate brown background. There is a large chip missing. This decorative floor tile was recovered from the shipwreck of the LOCH ARD. On the back, or base, of the tile is inscribed the number “46” and the letters “Minton & Co Patent Stoke upon Trent”.flagstaff hill, warrnambool, shipwrecked coast, flagstaff hill maritime museum, maritime museum, shipwreck coast, flagstaff hill maritime village, great ocean road, loch line, loch ard, captain gibbs, eva carmichael, tom pearce, glenample station, mutton bird island, loch ard gorge, encaustic tile, melbourne international exhibition, floor tile, minton floor tile -
 Ringwood and District Historical Society
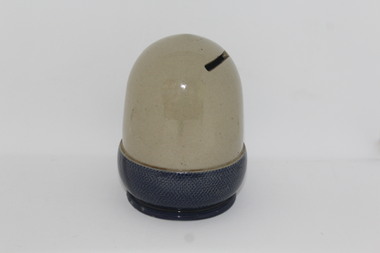
Ceramic - Money Box, Hand made ceramic money box made in East Ringwood from local clay - circa 1910, 21-Dec-14
Pottery, handmade money box. Blue base, bone coloured top with coin slot. -
 Ringwood and District Historical Society
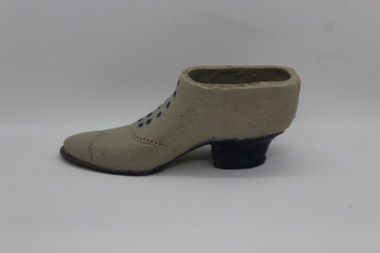
Ceramic - Ceramic Shoe, Hand made in East Ringwood from local clay - circa 1910, 21-Dec-14
... in East Ringwood from local clay - circa 1910 Bone coloured ...Bone coloured ceramic shoe marked with stitching lines and blue glazing depicting lace holes, heel, and sole. -
 Orbost & District Historical Society
pipe, 19th Century
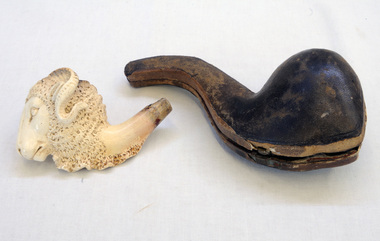
The first recorded use of meerschaum for making pipes was around 1723 and quickly became prized as the perfect material for providing a cool, dry, flavorful smoke. The porous nature of meerschaum draws moisture and tobacco tar into the stone. Meerschaum became a premium substitute for the clay pipes of the day and remains prized to this day, though briar pipes have become the most common pipes starting in the mid-1800s.A pipe made in the shape of a ram's head, coloured white or bone. It fits snugly into a shaped leather case which is hinged and closes to protect the pipe.pipe smoking tobacco -
 Warrnambool and District Historical Society Inc.
Functional object - Tile from the floor of the Nestle Factory - Dennington, Early to mid 20th Century
The Nestle factory at Dennington was commenced in 1907 and proved to be a big boost to the local economy. The first product manufactured was sweetened condensed milk which began in 1911 and by 1944 was the largest plant in the Southern Hemisphere. They went on to produce Lactogen, full cream milk powder and in 1966 Milo and Nescafe. On average up to 650 people were employed. Nestle relinquished their link with the site when it was sold to Fonterra in 2005. A relic from a significant part of Warrnambool’s history, industry and agriculture and a large number of long serving employees.Terracotta coloured six sided, one side flat and the reverse with raised bars. Material is either clay or concrete. Handwritten in pen, “from the floor of the Nestle Factory Dennington. warrnambool, dennington, nestle, condensed milk, nescafe, milo, lactogen. -
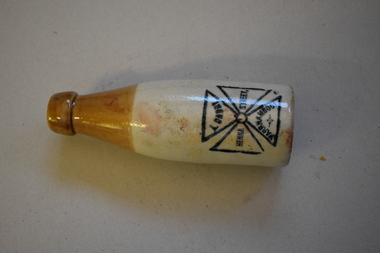 Warrnambool and District Historical Society Inc.
Bottle, The Bendigo Pottery Co. Pty. Ltd, L Darryl, Late 1890s
This bottle has been produced in the Epsom factory of the Bendigo Pottery works and used by Alfred Darby for bottling his ginger beer in the late 1890s. In 1897 Alfred Darby leased the cordial factory in Henna Street,Warrnambool, formerly the McSweeney Cordial Factory (and today the Alderdice Brass Foundry). He used the Maltese Cross as his logo on his bottles. He also had a cordial factory in Rochester, Victoria about the same time. In 1899 Alfred Darby advertised that he had re-located his cordial business to the old ‘Echo’ newspaper building in Koroit Street but it is not known whether the business opened there or if it did, for how long. This ceramic bottle is of interest as one of the late 19th century bottles used by Alfred Darby, a soft drinks manufacturer in Warrnambool. Cordial manufacturing was an important industry in Warrnambool for over 100 years.This is a ceramic brown and buff-coloured ginger beer bottle. It has a black logo in the shape of a Maltese Cross stamped on one side and the maker’s name etched into the clay near the base. It has no stopper and the main body of the bottle is somewhat stained. ‘A. Darby Henna Street Warrnambool’ ‘The Bendigo Pottery Coy. Pty. Ltd. Epsom Bendigo’ cordial manufacturers in warrnambool, history of warrnambool -
 Wangaratta RSL Sub Branch
Book - Cartoon, World at War, 1942
A history of sixty cartoons with text by David LOW a New Zealander of Scottish-Irish parentage. In 1919 he started work in London. His cartoons on world affairs had a wide reputation in Europe before the war were banned in Germany in 1936. Book without cover containing 60 plus cream coloured pages of cartoons World at War A history in Sixty Cartoons with a narrative text by LOWdavid low, world at war -
 Federation University Art Collection
Ceramic - Artwork- Ceramic, Blue Goblet by John O'Loughlin
... in the studio is one of quiet, determined interaction with clay, idea... in the studio is one of quiet, determined interaction with clay, idea ...John O'LOUGHLIN Born Snowtown, South Australia In 1980 John O'Loughlin's life changed when he started wheel throwing ceramic vessels. During this time he discarded the superfluous and unnecessary clutter collected on the journey of life, yet retaining the essence of what mattered to him. John O’Loughlin's later artworks engages with the way in which organised religion, specifically the Catholic Church, deals with the translation of the spiritual into the material. Informed by his extensive travels and studies, O’Loughlin’s ceramics reference the reliquaries and church artefacts that connect the life of this world with that of faith in another world. Completing undergeduate and post graduate works at Federation University John O'Loughlin's honours thesis was entitled "Ways and Means of Meaning, The Use of Symbol and Surface as Expressive Media in Ceramic Sculpture". The University provided a serious ceramic studio equipped with all the research tools for advanced ceramic exploration. Access to raw materials and a variety of kilns combined with excellent lecturers, mentors and technicians inspired, motivated and challenged him to push his accumulating knowledge to higher levels. O'Loughlin's working method in the studio is one of quiet, determined interaction with clay, idea and content. Experimentation with a variety of temperatures, firing methods and atmospheric conditions has produced a broad tonal and textural palette. He has worked with various clay bodies overlaid with coloured oxides, slips and engobes as the foundation for many of his works. O'Loughlin ufilised raised surfaces from old cemetery tombstones using the impressed forms and textures in his constructions. This research led him to the use of dry engobes to create a sense of antiquity, with crusty and distressed surfaces that resemble objects neglected in the oceans. These objects seem covered with the accretions and accumulations of history when re-discovered and brought to the surface as miraculous objects of mystery and magic. (https://www.thefreelibrary.com/John+O%27Loughlin%3A+a+man+re-invented.-a0216897107, accessed 12 September 2020) This item is part of the Federation University Art Collection. The Art Collection features over 2000 works and was listed as a 'Ballarat Treasure' in 2007.Botanical inspired wheel thrown goblet with decorative incised leaves on stem and flower head shaped cup. Glazed 'JOL' on bottom.art, artwork, goblet, botanical, ceramic, john o'loughlan -
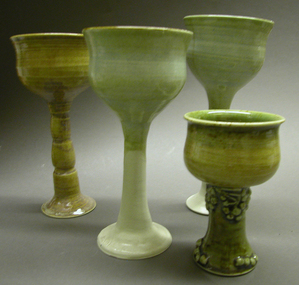 Federation University Art Collection
Ceramic - Artwork - Ceramics, Set of Four Goblets by John O'Loughlin
... in the studio is one of quiet, determined interaction with clay, idea... in the studio is one of quiet, determined interaction with clay, idea ...John O'LOUGHLIN Born Snowtown, South Australia In 1980 John O'Loughlin's life changed when he started wheel throwing ceramic vessels. During this time he discarded the superfluous and unnecessary clutter collected on the journey of life, yet retaining the essence of what mattered to him. John O’Loughlin's later artworks, such as 'Reliquary No. 20' engages with the way in which organised religion, specifically the Catholic Church, deals with the translation of the spiritual into the material. Informed by his extensive travels and studies, O’Loughlin’s ceramics reference the reliquaries and church artefacts that connect the life of this world with that of faith in another world. Completing undergeduate and post graduate works at Federation University John O'Loughlin's honours thesis was entitled "Ways and Means of Meaning, The Use of Symbol and Surface as Expressive Media in Ceramic Sculpture". The University provided a serious ceramic studio equipped with all the research tools for advanced ceramic exploration. Access to raw materials and a variety of kilns combined with excellent lecturers, mentors and technicians inspired, motivated and challenged him to push his accumulating knowledge to higher levels. O'Loughlin's working method in the studio is one of quiet, determined interaction with clay, idea and content. Experimentation with a variety of temperatures, firing methods and atmospheric conditions has produced a broad tonal and textural palette. He has worked with various clay bodies overlaid with coloured oxides, slips and engobes as the foundation for many of his works. O'Loughlin ufilised raised surfaces from old cemetery tombstones using the impressed forms and textures in his constructions. This research led him to the use of dry engobes to create a sense of antiquity, with crusty and distressed surfaces that resemble objects neglected in the oceans. These objects seem covered with the accretions and accumulations of history when re-discovered and brought to the surface as miraculous objects of mystery and magic. (https://www.thefreelibrary.com/John+O%27Loughlin%3A+a+man+re-invented.-a0216897107, accessed 12 September 2020) This item is part of the Federation University Art Collection. The Art Collection features over 2000 works and was listed as a 'Ballarat Treasure' in 2007.Four wheel thrown goblets, two with decorative stems. art, artwork, john o'loughlin, ceramics, goblets -
 Federation University Art Collection
Ceramic - Artwork - Ceramics, 'Reliquary No. 20' by John O'Loughlin, 2007
... in the studio is one of quiet, determined interaction with clay, idea... in the studio is one of quiet, determined interaction with clay, idea ...John O'LOUGHLIN Born Snowtown, South Australia In 1980 John O'Loughlin's life changed when he started wheel throwing ceramic vessels. During this time he discarded the superfluous and unnecessary clutter collected on the journey of life, yet retaining the essence of what mattered to him. John O’Loughlin's later artworks, such as 'Reliquary No. 20' engages with the way in which organised religion, specifically the Catholic Church, deals with the translation of the spiritual into the material. Informed by his extensive travels and studies, O’Loughlin’s ceramics reference the reliquaries and church artefacts that connect the life of this world with that of faith in another world. Completing undergeduate and post graduate works at Federation University John O'Loughlin's honours thesis was entitled "Ways and Means of Meaning, The Use of Symbol and Surface as Expressive Media in Ceramic Sculpture". The University provided a serious ceramic studio equipped with all the research tools for advanced ceramic exploration. Access to raw materials and a variety of kilns combined with excellent lecturers, mentors and technicians inspired, motivated and challenged him to push his accumulating knowledge to higher levels. O'Loughlin's working method in the studio is one of quiet, determined interaction with clay, idea and content. Experimentation with a variety of temperatures, firing methods and atmospheric conditions has produced a broad tonal and textural palette. He has worked with various clay bodies overlaid with coloured oxides, slips and engobes as the foundation for many of his works. O'Loughlin ufilised raised surfaces from old cemetery tombstones using the impressed forms and textures in his constructions. This research led him to the use of dry engobes to create a sense of antiquity, with crusty and distressed surfaces that resemble objects neglected in the oceans. These objects seem covered with the accretions and accumulations of history when re-discovered and brought to the surface as miraculous objects of mystery and magic. (https://www.thefreelibrary.com/John+O%27Loughlin%3A+a+man+re-invented.-a0216897107, accessed 12 September 2020) This item is part of the Federation University Art Collection. The Art Collection features over 2000 works and was listed as a 'Ballarat Treasure' in 2007.Lidded ceramic form.art, artwork, john o'loughlan, ceramics, available, available ceramics -
 Federation University Art Collection
Ceramic - hand built & coloured porcelain, 'Natural Series (Earth, Sky, Water)', by Li-Feng Lo, 2010
Li-Feng LO (1967- ) Born Taiwan Ceramic artist Dr Li-Feng Lo completed a PhD at Monash University in 2008. She was a resident artist in the Federation University Arts Academy ceramics studio in 2010. Li-Feng worked with Southern Ice porcelain to create sculptural forms in response to environmental concerns. Her work is informed by a philosophical and spiritual engagement with Buddhist ideas. These works were exhibited in the exhibition 'AIRed' at the Post Office Gallery in 2011. This was a group exhibition showcasing the work of six artists who undertook residencies at the Arts Academy over a couple of years. This item is part of the Federation University Art Collection. The Art Collection features over 1000 works and was listed as a 'Ballarat Treasure' in 2007.Handbuilt (pinched), coloured porcelain form. Artist's Statement: In the beginning I try to use clay to achiiece a dream-like quality by providing a feeling of flexibility like paper and fragility like glass. I was my artwork to the one with nature. Gift of the artist, 2010art, artwork, li-feng lo, ceramics, artist in residence, available, available ceramics -
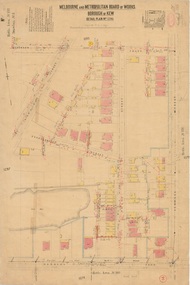 Kew Historical Society Inc
Plan, Melbourne & Metropolitan Board of Works : Borough of Kew : Detail Plan No.1296, 1904
The Melbourne and Metropolitan Board of Works (MMBW) plans were produced from the 1890s to the 1950s. They were crucial to the design and development of Melbourne's sewerage and drainage system. The plans, at a scale of 40 feet to 1 inch (1:480), provide a detailed historical record of Melbourne streetscapes and environmental features. Each plan covers one or two street blocks (roughly six streets), showing details of buildings, including garden layouts and ownership boundaries, and features such as laneways, drains, bridges, parks, municipal boundaries and other prominent landmarks as they existed at the time each plan was produced. (Source: State Library of Victoria)This plan forms part of a large group of MMBW plans and maps that was donated to the Society by the Mr Poulter, City Engineer of the City of Kew in 1989. Within this collection, thirty-five hand-coloured plans, backed with linen, are of statewide significance as they include annotations that provide details of construction materials used in buildings in the first decade of the 20th century as well as additional information about land ownership and usage. The copies in the Public Record Office Victoria and the State Library of Victoria are monochrome versions which do not denote building materials so that the maps in this collection are invaluable and unique tools for researchers and heritage consultants. A number of the plans are not held in the collection of the State Library of Victoria so they have the additional attribute of rarity.Original survey plan, issued by the MMBW to a contractor with responsibility for constructing sewers in the area identified on the plan within the Borough of Kew. The plan was at some stage hand-coloured, possibly by the contractor, but more likely by officers working in the Engineering Department of the Borough and later Town, then City of Kew. The hand-coloured sections of buildings on the plan were used to denote masonry or brick constructions (pink), weatherboard constructions (yellow), and public buildings (grey). This area was once known as O’Shaughnessy’s Paddock. O’Shaughnessy was the licensee of the Kew Hotel. The ‘Paddock’ or farm was for many years the closest farm to Melbourne. By 1903, when this plan was surveyed and lithographed, little of the farm remained. The area is dominated by a ‘clay hole’, on the site of the current Foley Reserve. It was used by Smart’s Brickyard from the 1880s until 1911, when the Council purchased it for a rubbish dump. It is notable as the site is one of the few industrial operations to have existed in Kew. By 1903, urban development was characterised by larger houses fronting Barkers Road and brick and weatherboard villas in Foley Street. Nearer the pit, weatherboard houses predominated. Foley Street bisected the triangular block and continued right to Denmark Street. At this stage, a house impeded the through road, only allowing access via a right of way to High Street.melbourne and metropolitan board of works, detail plans, mmbw 1296, cartography -
 Flagstaff Hill Maritime Museum and Village
Domestic object - Plate
The Process of Making Pottery Decorating, Firing, Glazing, Making, Technical There is a rhythm and flow to clay. It can’t be done all at once! Even the making process! It can take weeks to get everything done, especially if you can only work on your pottery once a week! Even though we have three hour classes, it’s often just not enough time! Here is an overview of some of the processes so you have a bit more grasp on some of the technical stuff! Step One – Design There are SO many ideas out there for making stuff in clay! From delicate porcelain jewellery, through to heavy sculptural work and everything in between. Deciding your direction is sometimes not that easy – when you first start, try everything, you will naturally gravitate to the style that you enjoy! The options and variations are endless and can get a wee bit overwhelming too! Check in with me before you start to ensure your ideas will work, what order you might do things, how you could achieve the look you are seeking and any other technical data required! Step Two – Making Clay is thixotropic. This means that as you work with it, the clay first gets sloppier and wetter, before is begins to dry in the atmosphere. For most things, you simply can’t do all parts of the project at once. An example of work order might look like: Get last weeks work out from the shelves Prepare clay for today’s work – roll your clay, prepare balls for throwing, make the first stage of a pinch pot) Clean up last week’s work and put it on the shelf for bisque firing Check that you have any glazing to do – and do enough of it that you will have time to finish your main project Do the next step of your next project – there might be a further step that can’t be complete immediately, in that case, wrap your work well and put onto the shelves. Letting your work rest for a while can really help keep your work clean and professional looking. Many things require bagging under plastic to keep it ready for work the next week – put your name on the outside of the bag so you can find your work easily. We have stickers and markers. Consider how you want to decorate your work – coloured slip can be applied at a fairly wet stage (remembering that it will make your work even wetter!). Trying to apply slip to dry clay won’t work! If you want to do sgraffito – you will need to keep the work leather hard (a state of dryness where you can still work the clay with a little effort and a little water and care). Step Three – Drying Most of the time your work can go into the rack uncovered to let it dry out for the following week. If you want to continue forming or shaping you will need to double bag your work – put your work on a suitable sized bat and put the bat in a bag so the base of the bag is under the bat, then put another bag over the top of the work and tuck the top of the bag under the bat. If you want to trim (or turn) your thrown work the following week, it should also be double bagged. If your work is large, delicate, or of uneven thicknesses, you should lightly cover your work for drying. When considering the drying process, bare in mind the weather, humidity and wind! The hotter and dryer, the faster things dry and work can dry unevenly in the shelves – this can lead to cracking – another time to lightly cover your work for drying. Step Four – Trimming and Cleaning Up Your work is dry! It is called greenware now and it is at it’s most fragile! Handle everything with two hands. I often refer to soft hands – keep everything gentle and with your fingers spread as much as possible. Try to not pick up things like plates too much, and always with both hands! Before your work can be bisque fired it should be “cleaned up”. You work won’t go into the kiln if it has sharp edges – when glazed, sharp edges turn into razor blades! Use a piece of fly wire to rub the work all over – this will scratch a little so be light handed. Use a knife or metal kidney to scrape any areas that require a bit more dynamic treatment than the fly wire offers! Finally, a very light wipe over with a slightly damp sponge can help soften and soothe all of your edges and dags! Trimming thrown work: If you are planning to trim (or turn) your thrown work (and you should be), make sure you bag it well – your work should be leather hard to almost dry for easiest trimming. Use this step to finish the work completely – use a metal kidney to polish the surface, or a slightly damp sponge to give a freshly thrown look. Wipe the sponge around the rim after trimming, and check the inside of the pot for dags! Trimming slip cast work: Usually I will trim the rims of your work on the wheel the following day to make that stage easier, however you will still need to check your work for lumps and bumps. Last but not least – check that your name is still clearly on the bottom of your work. Step Five – Bisque Firing When the work is completely dry it can go into the bisque kiln. The bisque kiln is fired to 1000°C. This process burns off the water in the clay as well as some of the chemically bound water. The structure of the clay is not altered that much at this temperature. Inside the bisque kiln, the work is stacked a little, small bowl inside a larger bowl and onto a heavy plate. Smaller items like decorations or drink coasters might get stacked several high. Consideration is paid to the weight of the stack and shape of the work. A bisque kiln can fire about one and a half times the amount of work that the glaze kiln can fire. The firing takes about 10 hours to complete the cycle and about two days to cool down. Once it has been emptied the work is placed in the glaze room ready for you to decorate! Step Six – Glazing Decorating your work with colour can be a lot of fun – and time consuming! There are three main options for surface treatment at this stage: Oxide Washes Underglazes Glazes Washes and underglazes do not “glaze” the work – It will still need a layer of glaze to fully seal the clay (washes don’t need glaze on surfaces not designed for food or liquid as they can gloss up a little on their own). Underglazes are stable colourants that turn out pretty much how they look in the jar. They can be mixed with each other to form other colours and can be used like water colours to paint onto your work. Mostly they should have a clear glaze on top to seal them. Oxides are a different species – the pink oxide (cobalt) wash turns out bright blue for instance. They don’t always need a glaze on top, and some glazes can change the colour of the wash! The glazes need no other “glaze” on top! Be careful of unknown glaze interactions – you can put any combination of glaze in a bowl or on a plate, but only a single glaze on the outside of any vertical surface! Glazes are a chemical reaction under heat. We don’t know the exact chemicals in the Mayco glazes we use. I can guess by the way they interact with each other, however, on the whole, you need to test every idea you have, and not run the test on a vertical surface! Simply put, glaze is a layer of glass like substance that bonds with the clay underneath. Clay is made of silica, alumina and water. Glaze is made of mostly silica. Silica has a melting point of 1700°C and we fire to 1240°C. The silica requires a “flux” to help it melt at the lower temperature. Fluxes can be all sorts of chemicals – a common one is calcium – calcium has a melting point of 2500°C, however, together they both melt at a much lower temperature! Colourants are metal oxides like cobalt (blue), chrome (green through black), copper (green, blue, even red!), manganese (black, purple and pink) iron (red brown), etc. Different chemicals in the glaze can have dramatic effects. for example, barium carbonate (which we don’t use) turns manganese bright pink! Other elements can turn manganese dioxide brown, blue, purple and reddish brown. Manganese dioxide is a flux in and of itself as well. So, glazes that get their black and purple colours, often interact with other glazes and RUN! Our mirror black is a good example – it mixes really well with many glazes because it fluxes them – causes them to melt faster. It will also bring out many beautiful colours in the glazes because it’s black colouring most definitely comes from manganese dioxide! Glaze chemistry is a whole subject on it’s own! We use commercial Mayco glazes on purpose – for their huge range of colour possibilities, stability, cool interactions, artistic freedom with the ability to easily brush the glazes on and ease of use. We currently have almost 50 glazes on hand! A major project is to test the interactions of all glazes with each other. That is 2,500 test tiles!!!! I’m going to make the wall behind the wheels the feature wall of pretty colours! Step Seven – Glaze (Gloss or sometimes called “Glost”) Firing Most of the time this is the final stage of making your creation (but not always!) The glaze kiln goes to 1240°C. This is called cone 6, or midrange. It is the low end of stoneware temperatures. Stoneware clays and glazes are typically fired at cone 8 – 10, that is 1260 – 1290°C. The energy requirement to go from 1240°C to 1280°C is almost a 30% more! Our clay is formulated to vitrify (mature, turn “glass-like”) at 1240°, as are our glazes. A glaze kiln take around 12 hours to reach temperature and two to three days to cool down. Sometimes a third firing process is required – this is for decoration that is added to work after the glaze firing. For example – adding precious metals and lustres. this firing temperature is usually around 600 – 800°C depending upon the techniques being used. There are many students interested in gold and silver trims – we will be doing this third type of firing soon! After firing your work will be in the student finished work shelves. Remember to pay for it before you head out the door! There is a small extra charge for using porcelain clay (it’s more than twice the price of regular clay), and for any third firing process! Once your work has been fired it can not turn back into clay for millennia – so don’t fire it if you don’t like it! Put it in the bucket for recycling. https://firebirdstudios.com.au/the-process-of-making-pottery/Ceramics have evolved over thousands of years.White earthenware dinner plate. Crazing evident all over.Backstamped ‘Made in England S LTD’flagstaff hill, warrnambool, shipwrecked-coast, flagstaff-hill, flagstaff-hill-maritime-museum, maritime-museum, shipwreck-coast, flagstaff-hill-maritime-village, ceramics, tableware -
 Flagstaff Hill Maritime Museum and Village
Domestic object - Plate, Johnson Bros
The Process of Making Pottery Decorating, Firing, Glazing, Making, Technical There is a rhythm and flow to clay. It can’t be done all at once! Even the making process! It can take weeks to get everything done, especially if you can only work on your pottery once a week! Even though we have three hour classes, it’s often just not enough time! Here is an overview of some of the processes so you have a bit more grasp on some of the technical stuff! Step One – Design There are SO many ideas out there for making stuff in clay! From delicate porcelain jewellery, through to heavy sculptural work and everything in between. Deciding your direction is sometimes not that easy – when you first start, try everything, you will naturally gravitate to the style that you enjoy! The options and variations are endless and can get a wee bit overwhelming too! Check in with me before you start to ensure your ideas will work, what order you might do things, how you could achieve the look you are seeking and any other technical data required! Step Two – Making Clay is thixotropic. This means that as you work with it, the clay first gets sloppier and wetter, before is begins to dry in the atmosphere. For most things, you simply can’t do all parts of the project at once. An example of work order might look like: Get last weeks work out from the shelves Prepare clay for today’s work – roll your clay, prepare balls for throwing, make the first stage of a pinch pot) Clean up last week’s work and put it on the shelf for bisque firing Check that you have any glazing to do – and do enough of it that you will have time to finish your main project Do the next step of your next project – there might be a further step that can’t be complete immediately, in that case, wrap your work well and put onto the shelves. Letting your work rest for a while can really help keep your work clean and professional looking. Many things require bagging under plastic to keep it ready for work the next week – put your name on the outside of the bag so you can find your work easily. We have stickers and markers. Consider how you want to decorate your work – coloured slip can be applied at a fairly wet stage (remembering that it will make your work even wetter!). Trying to apply slip to dry clay won’t work! If you want to do sgraffito – you will need to keep the work leather hard (a state of dryness where you can still work the clay with a little effort and a little water and care). Step Three – Drying Most of the time your work can go into the rack uncovered to let it dry out for the following week. If you want to continue forming or shaping you will need to double bag your work – put your work on a suitable sized bat and put the bat in a bag so the base of the bag is under the bat, then put another bag over the top of the work and tuck the top of the bag under the bat. If you want to trim (or turn) your thrown work the following week, it should also be double bagged. If your work is large, delicate, or of uneven thicknesses, you should lightly cover your work for drying. When considering the drying process, bare in mind the weather, humidity and wind! The hotter and dryer, the faster things dry and work can dry unevenly in the shelves – this can lead to cracking – another time to lightly cover your work for drying. Step Four – Trimming and Cleaning Up Your work is dry! It is called greenware now and it is at it’s most fragile! Handle everything with two hands. I often refer to soft hands – keep everything gentle and with your fingers spread as much as possible. Try to not pick up things like plates too much, and always with both hands! Before your work can be bisque fired it should be “cleaned up”. You work won’t go into the kiln if it has sharp edges – when glazed, sharp edges turn into razor blades! Use a piece of fly wire to rub the work all over – this will scratch a little so be light handed. Use a knife or metal kidney to scrape any areas that require a bit more dynamic treatment than the fly wire offers! Finally, a very light wipe over with a slightly damp sponge can help soften and soothe all of your edges and dags! Trimming thrown work: If you are planning to trim (or turn) your thrown work (and you should be), make sure you bag it well – your work should be leather hard to almost dry for easiest trimming. Use this step to finish the work completely – use a metal kidney to polish the surface, or a slightly damp sponge to give a freshly thrown look. Wipe the sponge around the rim after trimming, and check the inside of the pot for dags! Trimming slip cast work: Usually I will trim the rims of your work on the wheel the following day to make that stage easier, however you will still need to check your work for lumps and bumps. Last but not least – check that your name is still clearly on the bottom of your work. Step Five – Bisque Firing When the work is completely dry it can go into the bisque kiln. The bisque kiln is fired to 1000°C. This process burns off the water in the clay as well as some of the chemically bound water. The structure of the clay is not altered that much at this temperature. Inside the bisque kiln, the work is stacked a little, small bowl inside a larger bowl and onto a heavy plate. Smaller items like decorations or drink coasters might get stacked several high. Consideration is paid to the weight of the stack and shape of the work. A bisque kiln can fire about one and a half times the amount of work that the glaze kiln can fire. The firing takes about 10 hours to complete the cycle and about two days to cool down. Once it has been emptied the work is placed in the glaze room ready for you to decorate! Step Six – Glazing Decorating your work with colour can be a lot of fun – and time consuming! There are three main options for surface treatment at this stage: Oxide Washes Underglazes Glazes Washes and underglazes do not “glaze” the work – It will still need a layer of glaze to fully seal the clay (washes don’t need glaze on surfaces not designed for food or liquid as they can gloss up a little on their own). Underglazes are stable colourants that turn out pretty much how they look in the jar. They can be mixed with each other to form other colours and can be used like water colours to paint onto your work. Mostly they should have a clear glaze on top to seal them. Oxides are a different species – the pink oxide (cobalt) wash turns out bright blue for instance. They don’t always need a glaze on top, and some glazes can change the colour of the wash! The glazes need no other “glaze” on top! Be careful of unknown glaze interactions – you can put any combination of glaze in a bowl or on a plate, but only a single glaze on the outside of any vertical surface! Glazes are a chemical reaction under heat. We don’t know the exact chemicals in the Mayco glazes we use. I can guess by the way they interact with each other, however, on the whole, you need to test every idea you have, and not run the test on a vertical surface! Simply put, glaze is a layer of glass like substance that bonds with the clay underneath. Clay is made of silica, alumina and water. Glaze is made of mostly silica. Silica has a melting point of 1700°C and we fire to 1240°C. The silica requires a “flux” to help it melt at the lower temperature. Fluxes can be all sorts of chemicals – a common one is calcium – calcium has a melting point of 2500°C, however, together they both melt at a much lower temperature! Colourants are metal oxides like cobalt (blue), chrome (green through black), copper (green, blue, even red!), manganese (black, purple and pink) iron (red brown), etc. Different chemicals in the glaze can have dramatic effects. for example, barium carbonate (which we don’t use) turns manganese bright pink! Other elements can turn manganese dioxide brown, blue, purple and reddish brown. Manganese dioxide is a flux in and of itself as well. So, glazes that get their black and purple colours, often interact with other glazes and RUN! Our mirror black is a good example – it mixes really well with many glazes because it fluxes them – causes them to melt faster. It will also bring out many beautiful colours in the glazes because it’s black colouring most definitely comes from manganese dioxide! Glaze chemistry is a whole subject on it’s own! We use commercial Mayco glazes on purpose – for their huge range of colour possibilities, stability, cool interactions, artistic freedom with the ability to easily brush the glazes on and ease of use. We currently have almost 50 glazes on hand! A major project is to test the interactions of all glazes with each other. That is 2,500 test tiles!!!! I’m going to make the wall behind the wheels the feature wall of pretty colours! Step Seven – Glaze (Gloss or sometimes called “Glost”) Firing Most of the time this is the final stage of making your creation (but not always!) The glaze kiln goes to 1240°C. This is called cone 6, or midrange. It is the low end of stoneware temperatures. Stoneware clays and glazes are typically fired at cone 8 – 10, that is 1260 – 1290°C. The energy requirement to go from 1240°C to 1280°C is almost a 30% more! Our clay is formulated to vitrify (mature, turn “glass-like”) at 1240°, as are our glazes. A glaze kiln take around 12 hours to reach temperature and two to three days to cool down. Sometimes a third firing process is required – this is for decoration that is added to work after the glaze firing. For example – adding precious metals and lustres. this firing temperature is usually around 600 – 800°C depending upon the techniques being used. There are many students interested in gold and silver trims – we will be doing this third type of firing soon! After firing your work will be in the student finished work shelves. Remember to pay for it before you head out the door! There is a small extra charge for using porcelain clay (it’s more than twice the price of regular clay), and for any third firing process! Once your work has been fired it can not turn back into clay for millennia – so don’t fire it if you don’t like it! Put it in the bucket for recycling. https://firebirdstudios.com.au/the-process-of-making-pottery/Ceramics have evolved over thousands of years.A white earthenware side plate with a gadroon edge. Has water marks and chips on front.‘Johnson Bros England Reg No 15587’flagstaff hill, warrnambool, shipwrecked-coast, flagstaff-hill, flagstaff-hill-maritime-museum, maritime-museum, shipwreck-coast, flagstaff-hill-maritime-village, johnson bros, ceramics, tableware -
 Flagstaff Hill Maritime Museum and Village
Domestic object - Plate, Alfred Meakin
The Process of Making Pottery Decorating, Firing, Glazing, Making, Technical There is a rhythm and flow to clay. It can’t be done all at once! Even the making process! It can take weeks to get everything done, especially if you can only work on your pottery once a week! Even though we have three hour classes, it’s often just not enough time! Here is an overview of some of the processes so you have a bit more grasp on some of the technical stuff! Step One – Design There are SO many ideas out there for making stuff in clay! From delicate porcelain jewellery, through to heavy sculptural work and everything in between. Deciding your direction is sometimes not that easy – when you first start, try everything, you will naturally gravitate to the style that you enjoy! The options and variations are endless and can get a wee bit overwhelming too! Check in with me before you start to ensure your ideas will work, what order you might do things, how you could achieve the look you are seeking and any other technical data required! Step Two – Making Clay is thixotropic. This means that as you work with it, the clay first gets sloppier and wetter, before is begins to dry in the atmosphere. For most things, you simply can’t do all parts of the project at once. An example of work order might look like: Get last weeks work out from the shelves Prepare clay for today’s work – roll your clay, prepare balls for throwing, make the first stage of a pinch pot) Clean up last week’s work and put it on the shelf for bisque firing Check that you have any glazing to do – and do enough of it that you will have time to finish your main project Do the next step of your next project – there might be a further step that can’t be complete immediately, in that case, wrap your work well and put onto the shelves. Letting your work rest for a while can really help keep your work clean and professional looking. Many things require bagging under plastic to keep it ready for work the next week – put your name on the outside of the bag so you can find your work easily. We have stickers and markers. Consider how you want to decorate your work – coloured slip can be applied at a fairly wet stage (remembering that it will make your work even wetter!). Trying to apply slip to dry clay won’t work! If you want to do sgraffito – you will need to keep the work leather hard (a state of dryness where you can still work the clay with a little effort and a little water and care). Step Three – Drying Most of the time your work can go into the rack uncovered to let it dry out for the following week. If you want to continue forming or shaping you will need to double bag your work – put your work on a suitable sized bat and put the bat in a bag so the base of the bag is under the bat, then put another bag over the top of the work and tuck the top of the bag under the bat. If you want to trim (or turn) your thrown work the following week, it should also be double bagged. If your work is large, delicate, or of uneven thicknesses, you should lightly cover your work for drying. When considering the drying process, bare in mind the weather, humidity and wind! The hotter and dryer, the faster things dry and work can dry unevenly in the shelves – this can lead to cracking – another time to lightly cover your work for drying. Step Four – Trimming and Cleaning Up Your work is dry! It is called greenware now and it is at it’s most fragile! Handle everything with two hands. I often refer to soft hands – keep everything gentle and with your fingers spread as much as possible. Try to not pick up things like plates too much, and always with both hands! Before your work can be bisque fired it should be “cleaned up”. You work won’t go into the kiln if it has sharp edges – when glazed, sharp edges turn into razor blades! Use a piece of fly wire to rub the work all over – this will scratch a little so be light handed. Use a knife or metal kidney to scrape any areas that require a bit more dynamic treatment than the fly wire offers! Finally, a very light wipe over with a slightly damp sponge can help soften and soothe all of your edges and dags! Trimming thrown work: If you are planning to trim (or turn) your thrown work (and you should be), make sure you bag it well – your work should be leather hard to almost dry for easiest trimming. Use this step to finish the work completely – use a metal kidney to polish the surface, or a slightly damp sponge to give a freshly thrown look. Wipe the sponge around the rim after trimming, and check the inside of the pot for dags! Trimming slip cast work: Usually I will trim the rims of your work on the wheel the following day to make that stage easier, however you will still need to check your work for lumps and bumps. Last but not least – check that your name is still clearly on the bottom of your work. Step Five – Bisque Firing When the work is completely dry it can go into the bisque kiln. The bisque kiln is fired to 1000°C. This process burns off the water in the clay as well as some of the chemically bound water. The structure of the clay is not altered that much at this temperature. Inside the bisque kiln, the work is stacked a little, small bowl inside a larger bowl and onto a heavy plate. Smaller items like decorations or drink coasters might get stacked several high. Consideration is paid to the weight of the stack and shape of the work. A bisque kiln can fire about one and a half times the amount of work that the glaze kiln can fire. The firing takes about 10 hours to complete the cycle and about two days to cool down. Once it has been emptied the work is placed in the glaze room ready for you to decorate! Step Six – Glazing Decorating your work with colour can be a lot of fun – and time consuming! There are three main options for surface treatment at this stage: Oxide Washes Underglazes Glazes Washes and underglazes do not “glaze” the work – It will still need a layer of glaze to fully seal the clay (washes don’t need glaze on surfaces not designed for food or liquid as they can gloss up a little on their own). Underglazes are stable colourants that turn out pretty much how they look in the jar. They can be mixed with each other to form other colours and can be used like water colours to paint onto your work. Mostly they should have a clear glaze on top to seal them. Oxides are a different species – the pink oxide (cobalt) wash turns out bright blue for instance. They don’t always need a glaze on top, and some glazes can change the colour of the wash! The glazes need no other “glaze” on top! Be careful of unknown glaze interactions – you can put any combination of glaze in a bowl or on a plate, but only a single glaze on the outside of any vertical surface! Glazes are a chemical reaction under heat. We don’t know the exact chemicals in the Mayco glazes we use. I can guess by the way they interact with each other, however, on the whole, you need to test every idea you have, and not run the test on a vertical surface! Simply put, glaze is a layer of glass like substance that bonds with the clay underneath. Clay is made of silica, alumina and water. Glaze is made of mostly silica. Silica has a melting point of 1700°C and we fire to 1240°C. The silica requires a “flux” to help it melt at the lower temperature. Fluxes can be all sorts of chemicals – a common one is calcium – calcium has a melting point of 2500°C, however, together they both melt at a much lower temperature! Colourants are metal oxides like cobalt (blue), chrome (green through black), copper (green, blue, even red!), manganese (black, purple and pink) iron (red brown), etc. Different chemicals in the glaze can have dramatic effects. for example, barium carbonate (which we don’t use) turns manganese bright pink! Other elements can turn manganese dioxide brown, blue, purple and reddish brown. Manganese dioxide is a flux in and of itself as well. So, glazes that get their black and purple colours, often interact with other glazes and RUN! Our mirror black is a good example – it mixes really well with many glazes because it fluxes them – causes them to melt faster. It will also bring out many beautiful colours in the glazes because it’s black colouring most definitely comes from manganese dioxide! Glaze chemistry is a whole subject on it’s own! We use commercial Mayco glazes on purpose – for their huge range of colour possibilities, stability, cool interactions, artistic freedom with the ability to easily brush the glazes on and ease of use. We currently have almost 50 glazes on hand! A major project is to test the interactions of all glazes with each other. That is 2,500 test tiles!!!! I’m going to make the wall behind the wheels the feature wall of pretty colours! Step Seven – Glaze (Gloss or sometimes called “Glost”) Firing Most of the time this is the final stage of making your creation (but not always!) The glaze kiln goes to 1240°C. This is called cone 6, or midrange. It is the low end of stoneware temperatures. Stoneware clays and glazes are typically fired at cone 8 – 10, that is 1260 – 1290°C. The energy requirement to go from 1240°C to 1280°C is almost a 30% more! Our clay is formulated to vitrify (mature, turn “glass-like”) at 1240°, as are our glazes. A glaze kiln take around 12 hours to reach temperature and two to three days to cool down. Sometimes a third firing process is required – this is for decoration that is added to work after the glaze firing. For example – adding precious metals and lustres. this firing temperature is usually around 600 – 800°C depending upon the techniques being used. There are many students interested in gold and silver trims – we will be doing this third type of firing soon! After firing your work will be in the student finished work shelves. Remember to pay for it before you head out the door! There is a small extra charge for using porcelain clay (it’s more than twice the price of regular clay), and for any third firing process! Once your work has been fired it can not turn back into clay for millennia – so don’t fire it if you don’t like it! Put it in the bucket for recycling. https://firebirdstudios.com.au/the-process-of-making-pottery/Ceramics have evolved over thousands of years.Earthenware dessert plate, cream colour. Made by Alfred Meakin, England. Backstamped ‘Alfred Meakin England’. flagstaff hill, warrnambool, shipwrecked-coast, flagstaff-hill, flagstaff-hill-maritime-museum, maritime-museum, shipwreck-coast, flagstaff-hill-maritime-village, alfred meakin, ceramics, earthenware, kitchenware -
 Flagstaff Hill Maritime Museum and Village
Container - Bottle, 1840s to 1910
This handmade ‘gallon’ style of bottle was generally used for storing and transporting wine and ale. Many bottles similar to this one have their bases embossed with “6 TO THE GALLON”. It is one of many artefacts recovered from unidentified shipwrecks along Victoria’s coast between the late 1960s and the early 1970s. It is now part of the John Chance Collection. The capacity of this is one-sixth of a gallon (imperial measure), which is equal to 758 ml. (American bottles were often inscribed “5 TO THE GALLON”, which is one-fifth of an American gallon, equal to 757 ml.) Contemporary home brewers can purchase new ‘6 to gallon’ bottles that hold 750 ml. and are sold in cases of 36 bottles, which is equal to 6 gallons of wine. Glass was made thousands of years ago by heating together quartz-sand (Silica), lime and potash. Potash was obtained from burnt wood, but these days potash is mined. The natural sand had imperfections such as different forms of iron, resulting in ‘black’ glass, which was really dark green or dark amber colour. The ‘black’ glass was enhanced by residual carbon in the potash. Black glass is rarely used nowadays but most beer, wine, and liquors are still sold in dark coloured glass. Glass vessels were core-formed from around 1500 BC. An inner core with the vessel’s shape was formed around a rod using a porous material such as clay or dung. Molten glass was then modelled around the core and decorated. When the glass had cooled the vessel was immersed in water and the inner core became liquid and was washed out. Much more recently, bottlers were crafted by a glassblower using molten glass and a blow pipe together with other hand tools. Another method was using simple moulds, called dip moulds, that allowed the glass to be blown into the mould to form the base, then the glassblower would continue blowing free-form to shape the shoulders and neck. The bottle was then finished by applying a lip. These moulded bottles were more uniform in shape compared to the free-form bottles originally produced. English glassblowers in the mid-1800s were making some bottles with 2-piece and 3-piece moulds, some with a push-up style base, sometimes with embossing in the base as well. Improvements allowed the moulds to also have embossed and patterned sides, and straight sided shapes such as hexagons. Bottles made in full moulds usually displayed seam seams or lines. These process took skill and time, making the bottles valuable, so they were often recycled. By the early 20th century bottles were increasingly machine made, which greatly reduced the production time and cost. This bottle is historically significant as an example of a handmade, blown inscribed glass bottle manufactured in the mid-to-late 1800s for specific use as a liquor bottle with a set measurement of one-sixth of gallon. It is also historically significant as an example of liquor bottles imported into Colonial Victoria in the mid-to-late 1800s, giving a snapshot into history and social life that occurred during the early days of Victoria’s development, and the sea trade that visited the ports in those days. The bottle is also significant as one of a group of bottles recovered by John Chance, a diver in Victoria’s coastal waters in the late 1960s to early 1970s. Items that come from several wrecks have since been donated to the Flagstaff Hill Maritime Village’s museum collection of shipwreck artefacts by his family, illustrating this item’s level of historical value. Bottle, brown glass, handmade. Tall slim Gallon style liquor bottle. Applied, double collar lip; square upper with flared lower. Neck has seams and shoulder seam from 3-piece mould. Body with horizontal ripples tapers inwards to base. Push-up base with pontil mark and embossed inscription. Tape over wire around mouth. Cork remnants inside mouth. Embossed on base "6 TO THE GALLON"flagstaff hill, warrnambool, flagstaff hill maritime museum, maritime museum, shipwreck coast, flagstaff hill maritime village, great ocean road, shipwreck artefact, john chance, glass bottle, antique bottle, gallon bottle, 6 to the gallon bottle, handmade, dip mould, mouth blown, pontil mark, blown bottle, liquor bottle, ale bottle, double collar, 19th century bottle, collectable -
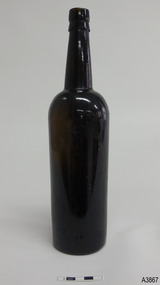 Flagstaff Hill Maritime Museum and Village
Container - Bottle, 1840s to 1910
This handmade ‘gallon’ style of bottle was generally used for storing and transporting wine and ale. Many bottles similar to this one have their bases embossed with “6 TO THE GALLON”. It is one of many artefacts recovered from unidentified shipwrecks along Victoria’s coast between the late 1960s and the early 1970s. It is now part of the John Chance Collection. The capacity of this is one-sixth of a gallon (imperial measure), which is equal to 758 ml. (American bottles were often inscribed “5 TO THE GALLON”, which is one-fifth of an American gallon, equal to 757 ml.) Contemporary home brewers can purchase new ‘6 to gallon’ bottles that hold 750 ml. and are sold in cases of 36 bottles, which is equal to 6 gallons of wine. Glass was made thousands of years ago by heating together quartz-sand (Silica), lime and potash. Potash was obtained from burnt wood, but these days potash is mined. The natural sand had imperfections such as different forms of iron, resulting in ‘black’ glass, which was really dark green or dark amber colour. The ‘black’ glass was enhanced by residual carbon in the potash. Black glass is rarely used nowadays but most beer, wine, and liquors are still sold in dark coloured glass. Glass vessels were core-formed from around 1500 BC. An inner core with the vessel’s shape was formed around a rod using a porous material such as clay or dung. Molten glass was then modelled around the core and decorated. When the glass had cooled the vessel was immersed in water and the inner core became liquid and was washed out. Much more recently, bottlers were crafted by a glassblower using molten glass and a blow pipe together with other hand tools. Another method was using simple moulds, called dip moulds, that allowed the glass to be blown into the mould to form the base, then the glassblower would continue blowing free-form to shape the shoulders and neck. The bottle was then finished by applying a lip. These moulded bottles were more uniform in shape compared to the free-form bottles originally produced. English glassblowers in the mid-1800s were making some bottles with 2-piece and 3-piece moulds, some with a push-up style base, sometimes with embossing in the base as well. Improvements allowed the moulds to also have embossed and patterned sides, and straight sided shapes such as hexagons. Bottles made in full moulds usually displayed seam seams or lines. These process took skill and time, making the bottles valuable, so they were often recycled. By the early 20th century bottles were increasingly machine made, which greatly reduced the production time and cost. This bottle is historically significant as an example of a handmade, blown inscribed glass bottle manufactured in the mid-to-late 1800s for specific use as a liquor bottle with a set measurement of one-sixth of gallon. It is also historically significant as an example of liquor bottles imported into Colonial Victoria in the mid-to-late 1800s, giving a snapshot into history and social life that occurred during the early days of Victoria’s development, and the sea trade that visited the ports in those days. The bottle is also significant as one of a group of bottles recovered by John Chance, a diver in Victoria’s coastal waters in the late 1960s to early 1970s. Items that come from several wrecks have since been donated to the Flagstaff Hill Maritime Village’s museum collection of shipwreck artefacts by his family, illustrating this item’s level of historical value. Bottle, brown glass, handmade. Tall slim Gallon style liquor bottle. Applied double collar lip; square upper with flared lower. Push-up base with pontil mark and embossed inscription. Base is uneven, glass composition has imperfections.Embossed on base "6 TO THE GALLON"flagstaff hill, warrnambool, flagstaff hill maritime museum, maritime museum, shipwreck coast, flagstaff hill maritime village, great ocean road, shipwreck artefact, john chance, glass bottle, antique bottle, gallon bottle, 6 to the gallon bottle, handmade, dip mould, mouth blown, pontil mark, blown bottle, liquor bottle, ale bottle, double collar, 19th century bottle, collectable -
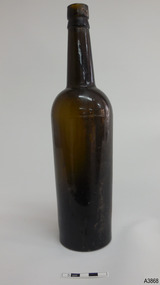 Flagstaff Hill Maritime Museum and Village
Container - Bottle, 1840s to 1910
This handmade ‘gallon’ style of bottle was generally used for storing and transporting wine and ale. Many bottles similar to this one have their bases embossed with “6 TO THE GALLON”. It is one of many artefacts recovered from unidentified shipwrecks along Victoria’s coast between the late 1960s and the early 1970s. It is now part of the John Chance Collection. The capacity of this is one-sixth of a gallon (imperial measure), which is equal to 758 ml. (American bottles were often inscribed “5 TO THE GALLON”, which is one-fifth of an American gallon, equal to 757 ml.) Contemporary home brewers can purchase new ‘6 to gallon’ bottles that hold 750 ml. and are sold in cases of 36 bottles, which is equal to 6 gallons of wine. Glass was made thousands of years ago by heating together quartz-sand (Silica), lime and potash. Potash was obtained from burnt wood, but these days potash is mined. The natural sand had imperfections such as different forms of iron, resulting in ‘black’ glass, which was really dark green or dark amber colour. The ‘black’ glass was enhanced by residual carbon in the potash. Black glass is rarely used nowadays but most beer, wine, and liquors are still sold in dark coloured glass. Glass vessels were core-formed from around 1500 BC. An inner core with the vessel’s shape was formed around a rod using a porous material such as clay or dung. Molten glass was then modelled around the core and decorated. When the glass had cooled the vessel was immersed in water and the inner core became liquid and was washed out. Much more recently, bottlers were crafted by a glassblower using molten glass and a blow pipe together with other hand tools. Another method was using simple moulds, called dip moulds, that allowed the glass to be blown into the mould to form the base, then the glassblower would continue blowing free-form to shape the shoulders and neck. The bottle was then finished by applying a lip. These moulded bottles were more uniform in shape compared to the free-form bottles originally produced. English glassblowers in the mid-1800s were making some bottles with 2-piece and 3-piece moulds, some with a push-up style base, sometimes with embossing in the base as well. Improvements allowed the moulds to also have embossed and patterned sides, and straight sided shapes such as hexagons. Bottles made in full moulds usually displayed seam seams or lines. These process took skill and time, making the bottles valuable, so they were often recycled. By the early 20th century bottles were increasingly machine made, which greatly reduced the production time and cost. This bottle is historically significant as an example of a handmade, blown inscribed glass bottle manufactured in the mid-to-late 1800s for specific use as a liquor bottle with a set measurement of one-sixth of gallon. It is also historically significant as an example of liquor bottles imported into Colonial Victoria in the mid-to-late 1800s, giving a snapshot into history and social life that occurred during the early days of Victoria’s development, and the sea trade that visited the ports in those days. The bottle is also significant as one of a group of bottles recovered by John Chance, a diver in Victoria’s coastal waters in the late 1960s to early 1970s. Items that come from several wrecks have since been donated to the Flagstaff Hill Maritime Village’s museum collection of shipwreck artefacts by his family, illustrating this item’s level of historical value. Bottle, brown glass, handmade. Tall slim Gallon style liquor bottle. Applied double collar lip; square upper and flared lower. Neck has seams and shoulder seam from 3-piece mould. Body tapers towards base. Push-up base with pontil mark and embossed inscription. Base is uneven. Mouth has remnants of the seal in it and tape remnants around its outside. Embossed on base "6 TO THE GALLON"flagstaff hill, warrnambool, flagstaff hill maritime museum, maritime museum, shipwreck coast, flagstaff hill maritime village, great ocean road, shipwreck artefact, john chance, glass bottle, antique bottle, gallon bottle, 6 to the gallon bottle, handmade, dip mould, mouth blown, pontil mark, blown bottle, liquor bottle, ale bottle, double collar, 19th century bottle, collectable -
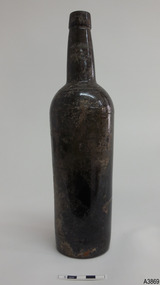 Flagstaff Hill Maritime Museum and Village
Container - Bottle, 1840s to 1910
This handmade ‘gallon’ style of bottle was generally used for storing and transporting wine and ale. Many bottles similar to this one have their bases embossed with “6 TO THE GALLON”. It is one of many artefacts recovered from unidentified shipwrecks along Victoria’s coast between the late 1960s and the early 1970s. It is now part of the John Chance Collection. The capacity of this is one-sixth of a gallon (imperial measure), which is equal to 758 ml. (American bottles were often inscribed “5 TO THE GALLON”, which is one-fifth of an American gallon, equal to 757 ml.) Contemporary home brewers can purchase new ‘6 to gallon’ bottles that hold 750 ml. and are sold in cases of 36 bottles, which is equal to 6 gallons of wine. Glass was made thousands of years ago by heating together quartz-sand (Silica), lime and potash. Potash was obtained from burnt wood, but these days potash is mined. The natural sand had imperfections such as different forms of iron, resulting in ‘black’ glass, which was really dark green or dark amber colour. The ‘black’ glass was enhanced by residual carbon in the potash. Black glass is rarely used nowadays but most beer, wine, and liquors are still sold in dark coloured glass. Glass vessels were core-formed from around 1500 BC. An inner core with the vessel’s shape was formed around a rod using a porous material such as clay or dung. Molten glass was then modelled around the core and decorated. When the glass had cooled the vessel was immersed in water and the inner core became liquid and was washed out. Much more recently, bottlers were crafted by a glassblower using molten glass and a blow pipe together with other hand tools. Another method was using simple moulds, called dip moulds, that allowed the glass to be blown into the mould to form the base, then the glassblower would continue blowing free-form to shape the shoulders and neck. The bottle was then finished by applying a lip. These moulded bottles were more uniform in shape compared to the free-form bottles originally produced. English glassblowers in the mid-1800s were making some bottles with 2-piece and 3-piece moulds, some with a push-up style base, sometimes with embossing in the base as well. Improvements allowed the moulds to also have embossed and patterned sides, and straight sided shapes such as hexagons. Bottles made in full moulds usually displayed seam seams or lines. These process took skill and time, making the bottles valuable, so they were often recycled. By the early 20th century bottles were increasingly machine made, which greatly reduced the production time and cost. This bottle is historically significant as an example of a handmade, blown inscribed glass bottle manufactured in the mid-to-late 1800s for specific use as a liquor bottle. It is also historically significant as an example of liquor bottles imported into Colonial Victoria in the mid-to-late 1800s, giving a snapshot into history and social life that occurred during the early days of Victoria’s development, and the sea trade that visited the ports in those days. The bottle is also significant as one of a group of bottles recovered by John Chance, a diver in Victoria’s coastal waters in the late 1960s to early 1970s. Items that come from several wrecks have since been donated to the Flagstaff Hill Maritime Village’s museum collection of shipwreck artefacts by his family, illustrating this item’s level of historical value. Bottle, olive green glass, handmade. Tall slim, Gallon style liquor bottle. Applied double collar lip; square upper with flared lower. Neck is slightly bulged and there is a mould seam where shoulder joins base. Body tapers inward to base. Uneven base with deep push-up centre with small pontil mark. Scratches and imperfections in glass. Also encrustations on surface. flagstaff hill, warrnambool, flagstaff hill maritime museum, maritime museum, shipwreck coast, flagstaff hill maritime village, great ocean road, shipwreck artefact, john chance, glass bottle, antique bottle, gallon bottle, handmade, dip mould, mouth blown, pontil mark, blown bottle, liquor bottle, ale bottle, double collar, 19th century bottle, collectable -
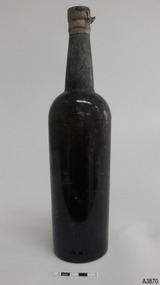 Flagstaff Hill Maritime Museum and Village
Container - Bottle, 1840s to 1910
This handmade ‘gallon’ style of bottle was generally used for storing and transporting wine and ale. Many bottles similar to this one have their bases embossed with “6 TO THE GALLON”. It is one of many artefacts recovered from unidentified shipwrecks along Victoria’s coast between the late 1960s and the early 1970s. It is now part of the John Chance Collection. The capacity of this is one-sixth of a gallon (imperial measure), which is equal to 758 ml. (American bottles were often inscribed “5 TO THE GALLON”, which is one-fifth of an American gallon, equal to 757 ml.) Contemporary home brewers can purchase new ‘6 to gallon’ bottles that hold 750 ml. and are sold in cases of 36 bottles, which is equal to 6 gallons of wine. Glass was made thousands of years ago by heating together quartz-sand (Silica), lime and potash. Potash was obtained from burnt wood, but these days potash is mined. The natural sand had imperfections such as different forms of iron, resulting in ‘black’ glass, which was really dark green or dark amber colour. The ‘black’ glass was enhanced by residual carbon in the potash. Black glass is rarely used nowadays but most beer, wine, and liquors are still sold in dark coloured glass. Glass vessels were core-formed from around 1500 BC. An inner core with the vessel’s shape was formed around a rod using a porous material such as clay or dung. Molten glass was then modelled around the core and decorated. When the glass had cooled the vessel was immersed in water and the inner core became liquid and was washed out. Much more recently, bottlers were crafted by a glassblower using molten glass and a blow pipe together with other hand tools. Another method was using simple moulds, called dip moulds, that allowed the glass to be blown into the mould to form the base, then the glassblower would continue blowing free-form to shape the shoulders and neck. The bottle was then finished by applying a lip. These moulded bottles were more uniform in shape compared to the free-form bottles originally produced. English glassblowers in the mid-1800s were making some bottles with 2-piece and 3-piece moulds, some with a push-up style base, sometimes with embossing in the base as well. Improvements allowed the moulds to also have embossed and patterned sides, and straight sided shapes such as hexagons. Bottles made in full moulds usually displayed seam seams or lines. These process took skill and time, making the bottles valuable, so they were often recycled. By the early 20th century bottles were increasingly machine made, which greatly reduced the production time and cost. This bottle is historically significant as an example of a handmade, blown inscribed glass bottle manufactured in the mid-to-late 1800s for specific use as a liquor bottle with a set measurement of one-sixth of gallon. It is also historically significant as an example of liquor bottles imported into Colonial Victoria in the mid-to-late 1800s, giving a snapshot into history and social life that occurred during the early days of Victoria’s development, and the sea trade that visited the ports in those days. The bottle is also significant as one of a group of bottles recovered by John Chance, a diver in Victoria’s coastal waters in the late 1960s to early 1970s. Items that come from several wrecks have since been donated to the Flagstaff Hill Maritime Village’s museum collection of shipwreck artefacts by his family, illustrating this item’s level of historical value. Bottle, olive green glass, handmade. Tall slim Gallon style liquor bottle. Applied double collar lip; square upper and flared lower. Mouth has remnants of tape and wire seal. Mould seam around shoulder. Body tapers slightly inward to the base. Push-up base has pontil mark and is embossed in large letters. Base is uneven. Embossed on base "6 TO THE GALLON"flagstaff hill, warrnambool, flagstaff hill maritime museum, maritime museum, shipwreck coast, flagstaff hill maritime village, great ocean road, shipwreck artefact, john chance, glass bottle, antique bottle, gallon bottle, 6 to the gallon bottle, handmade, dip mould, mouth blown, pontil mark, blown bottle, liquor bottle, ale bottle, double collar, 19th century bottle, collectable -
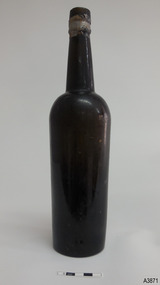 Flagstaff Hill Maritime Museum and Village
Container - Bottle, 1840s to 1910
This handmade ‘gallon’ style of bottle was generally used for storing and transporting wine and ale. Many bottles similar to this one have their bases embossed with “6 TO THE GALLON”. However, this bottle is rare, in that the base has been embossed then over-embossed with the same text, letters overlapping. It is one of many artefacts recovered from unidentified shipwrecks along Victoria’s coast between the late 1960s and the early 1970s. It is now part of the John Chance Collection. The capacity of this is one-sixth of a gallon (imperial measure), which is equal to 758 ml. (American bottles were often inscribed “5 TO THE GALLON”, which is one-fifth of an American gallon, equal to 757 ml.) Contemporary home brewers can purchase new ‘6 to gallon’ bottles that hold 750 ml. and are sold in cases of 36 bottles, which is equal to 6 gallons of wine. Glass was made thousands of years ago by heating together quartz-sand (Silica), lime and potash. Potash was obtained from burnt wood, but these days potash is mined. The natural sand had imperfections such as different forms of iron, resulting in ‘black’ glass, which was really dark green or dark amber colour. The ‘black’ glass was enhanced by residual carbon in the potash. Black glass is rarely used nowadays but most beer, wine, and liquors are still sold in dark coloured glass. Glass vessels were core-formed from around 1500 BC. An inner core with the vessel’s shape was formed around a rod using a porous material such as clay or dung. Molten glass was then modelled around the core and decorated. When the glass had cooled the vessel was immersed in water and the inner core became liquid and was washed out. Much more recently, bottlers were crafted by a glassblower using molten glass and a blow pipe together with other hand tools. Another method was using simple moulds, called dip moulds, that allowed the glass to be blown into the mould to form the base, then the glassblower would continue blowing free-form to shape the shoulders and neck. The bottle was then finished by applying a lip. These moulded bottles were more uniform in shape compared to the free-form bottles originally produced. English glassblowers in the mid-1800s were making some bottles with 2-piece and 3-piece moulds, some with a push-up style base, sometimes with embossing in the base as well. Improvements allowed the moulds to also have embossed and patterned sides, and straight sided shapes such as hexagons. Bottles made in full moulds usually displayed seam seams or lines. These process took skill and time, making the bottles valuable, so they were often recycled. By the early 20th century bottles were increasingly machine made, which greatly reduced the production time and cost. This bottle is a rare find, in that the base has been over-embossed with the same lettering, letters overlapping one another. This bottle is historically significant as an example of a handmade, blown inscribed glass bottle manufactured in the mid-to-late 1800s for specific use as a liquor bottle with a set measurement of one-sixth of gallon. It is also historically significant as an example of liquor bottles imported into Colonial Victoria in the mid-to-late 1800s, giving a snapshot into history and social life that occurred during the early days of Victoria’s development, and the sea trade that visited the ports in those days. The bottle is also significant as one of a group of bottles recovered by John Chance, a diver in Victoria’s coastal waters in the late 1960s to early 1970s. Items that come from several wrecks have since been donated to the Flagstaff Hill Maritime Village’s museum collection of shipwreck artefacts by his family, illustrating this item’s level of historical value. Bottle, over embossed, brown glass, handmade, rare. Tall slim Gallon style liquor bottle. Applied double collar lip; square upper and flared lower. Mouth has sealing tape remnants around top. Mould seam around shoulder. Body tapers inwards to push-up base. Top edge of lip has application faults. There is also a rectangular indent in the upper edge of lip. Base is embossed and over embossed, with the letters overlapping each other. Embossed on base "6 TO THE GALLON", then over-embossed with the same "6 TO THE GALLON"flagstaff hill, warrnambool, flagstaff hill maritime museum, maritime museum, shipwreck coast, flagstaff hill maritime village, great ocean road, shipwreck artefact, john chance, glass bottle, antique bottle, gallon bottle, 6 to the gallon bottle, handmade, dip mould, mouth blown, pontil mark, blown bottle, liquor bottle, ale bottle, double collar, 19th century bottle, collectable, over embossed, rare